• Integrations
  • Entra ID
product logo
Back button image Back
Back button image
product logo

Connect LogMeIn Resolve MDM to Microsoft Entra ID

To benefit from using automated workflows, LogMeIn Resolve MDM can be integrated with Microsoft Entra ID.

  1. In LogMeIn Resolve MDM, navigate to System > Integrations.

    Result: The Integrations page is displayed, where you can get a list of all available applications, or you can filter the list for applications that are already connected to LogMeIn Resolve MDM.

  2. Select Microsoft Entra ID.

    Result: The General tab is displayed by default.

  3. Select Connect.

    Result: The Microsoft Entra ID connection page is displayed.

  4. Open Microsoft Azure and enable the integration between your LogMeIn Resolve MDM site and Microsoft Entra ID. To enable the integration, you need to register an application for LogMeIn Resolve MDM in Azure. For more information, see Register an application to integrate LogMeIn Resolve MDM with Microsoft Entra ID.
  5. Provide the required credentials of the registered LogMeIn Resolve MDM site, then select Connect.
    You can get the values for the required credentials when registering your LogMeIn Resolve MDM site with Microsoft Entra ID.
    Provide the following credentials:
    • Client ID (shown as Application (client) ID in Entra ID)
    • Client secret (shown as Value, not Secret ID, in Entra ID)
    • Tenant (shown as Directory (tenant) ID in Entra ID)

Results: Microsoft Entra ID is connected and ready to use. The connected status is shown on the Integrations page in LogMeIn Resolve MDM.

Register an application to integrate LogMeIn Resolve MDM with Microsoft Entra ID

Registering an application establishes trust between LogMeIn Resolve MDM and Microsoft Entra ID.

Before you begin: You must have an admin account on Microsoft Azure.
  1. Register an application in Azure to integrate LogMeIn Resolve MDM with Microsoft Entra ID.
  2. When the registration is ready, copy the Client ID and Tenant information from the Overview pane, as you will need them to set up the connection in LogMeIn Resolve MDM.
    For more information, see Register an application in Azure.
  3. Set the application permissions.
    For more information, see Define permissions for an application in Azure.
  4. Generate a client secret for the application and copy its value, as you will need it to set up the connection in LogMeIn Resolve MDM.
    For more information, see Generate a client secret in Azure.

Register an application in Azure

  1. Log in to Azure at https://portal.azure.com/ as an admin.
  2. Navigate to Microsoft Entra ID.
    To open Microsoft Entra ID, you can select View on the Manage Microsoft Entra ID tile.
  3. Select Manage > App registrations.
  4. Select New registration.
  5. Define a name for your application. This will be the user-facing name for your app.
  6. In Supported account types, select Accounts in this organizational directory only.
  7. Select Register.
    Note: The Overview page contains the details of your registered application. Copy the Application (client) ID and the Directory (tenant) ID, as you will need them to create the connection in LogMeIn Resolve MDM.

    Learn more about registering an application from Microsoft's documentation.

Define permissions for an application in Azure

Before you begin: You must register an application in Microsoft Azure.
  1. In Azure, navigate to Manage > App registrations on the left.
  2. Open the All applications tab and select the application for which you want to give permissions.

    Result: The application's page opens.

  3. In the left navigation menu, select Manage > API permissions.
  4. Select Add a permission.
  5. To open the permission interface, select Microsoft Graph.
  6. Select Application permissions.
  7. Under User, select User.Read.All.
  8. Under Group, select Group.Read.All for group filtering.
  9. Select Add permissions.
    Note: You need admin permissions to grant the User.Read.All and Group.Read.All permissions to your application.
  10. Select Grant admin consent for Default Directory.
    Note: You need admin permissions to perform this step.

    Result: The status of the user permission is modified to Granted for Default Directory.

Generate a client secret in Azure

Before you begin: You must register an application in Microsoft Azure.
  1. In Azure, navigate to Manage > App registrations on the left.
  2. Open the All applications tab and select the application for which you want to give permissions.

    Result: The application's page opens.

  3. In the left navigation menu, select Manage > Certificates & secrets.
  4. On the Client secrets tab, select New client secret.
  5. Fill in the following fields:
    • Description: the name of the client secret
    • Expires: the expiration date of the client secret
  6. Using the clipboard icon, copy the value of the secret, as you will need it to create the connection in LogMeIn Resolve MDM.
    Important: Make sure you copy the value of the secret, not the ID of the secret.

    Learn more about creating a client secret from Microsoft's documentation.

Troubleshooting common issues with Microsoft Entra ID integration

Some of the issues you might encounter with your Entra ID integration can easily be fixed.

Error: 400 – Bad Request

This error occurs when one or more of the following fields contains incorrect information:
  • Client ID (shown as Application (client) ID in Entra ID)
  • Client secret (shown as Value, not Secret ID, in Entra ID)
  • Tenant (shown as Directory (tenant) ID in Entra ID)

To correct this error, ensure that you use the credentials provided in the application that you created and you are not using the tenant properties of your Entra ID account. For more information, see Connect LogMeIn Resolve MDM to Microsoft Entra ID.

Error: 401 – Unauthorized

You might receive an Error: 401 – Unauthorized message while connecting Entra ID to LogMeIn Resolve MDM if one or more of the following fields contains incorrect information:
  • Client ID (shown as Application (client) ID in Entra ID)
  • Client secret (shown as Value, not Secret ID, in Entra ID)
  • Tenant (shown as Directory (tenant) ID in Entra ID)

To correct this error, ensure that you use the credentials provided in the application that you created and you are not using the tenant properties of your Entra ID account. For more information, see Connect LogMeIn Resolve MDM to Microsoft Entra ID.

Error: 403 – Forbidden

An Error: 403 - Forbidden message can appear during application registration if the configured permission type is not set to Application.


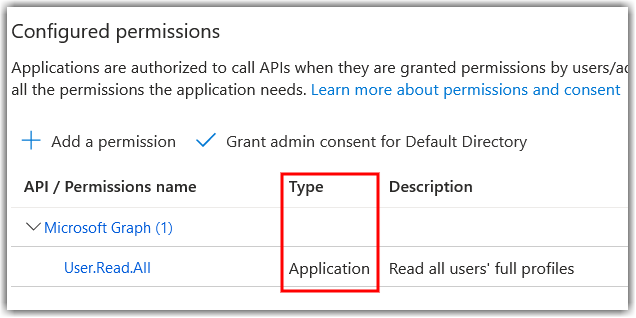
Correctly configured permission type in Azure

This error can also occur if you do not select Grant admin consent for Default Directory for the User.Read.All and Group.Read.All permissions while defining permissions for your application.

To correct this error, follow the steps in Define permissions for an application in Azure.

Users are not visible in LogMeIn Resolve MDM

Your Entra ID users might not be visible in LogMeIn Resolve MDM if they have no email address defined in Entra ID. To check if your users have their email address assigned, do the following:
  1. In Entra ID, navigate to Manage > Users.
  2. If the Email column is not visible in the table, select Manage view > Edit columns and enable the Email column.
If your users do not have their email address assigned, do the following to update their information:
  1. Open the user entry and on the Overview tab, select Edit properties at the top.
    Note: While the User principal name might look like an email address, it is not sufficient to link the user entry to LogMeIn Resolve MDM.
  2. Navigate to the Contact Information tab and enter the user's email address in the Email field, then select Save.

Insufficient privileges during filter testing

When testing an Entra ID user query filter, you might encounter the error "Insufficient privileges. Please check that all necessary app permissions have been assigned in Entra ID.". To correct this error, check that the Group.Read.All and User.Read.All permissions are granted in Entra ID. If they are missing, add them, then grant admin consent for both.

For more information on granting permissions, see Define permissions for an application in Azure.

Issues with Workflows when Entra ID is connected

Your Entra ID client secret might have expired if you encounter one or more of the following issues:
  • Your Workflows suddently don't work even though they used to.
  • You receive an Error: 401 – Unauthorized message during filter testing.
  • The Action log shows an error for a workflow.

To resolve this issue, generate a new client secret in Azure as described in Generate a client secret in Azure.

Related Articles:
  • Entra ID integration
  • Create an Entra ID user query
  • Application integrations with LogMeIn Resolve MDM
Article last updated: 21 May, 2025

Need help?

Contact icon Contact support
Manage Cases icon Manage cases
Video icon Watch videos
  • Language selector icon Language selector icon
    • English
    • Français
    • Italiano
    • Deutsch
    • Español
    • Português
    • Nederlands
  • About Us
  • Terms of Service
  • Privacy Policy
  • Trademark
  • Do Not Sell or Share My Personal Info
  • Browse Products
  • Copyright © 2025 GoTo Group, Inc. All rights reserved

Collaboration Products

GoTo Connect

GoTo Meeting

GoTo Webinar

GoTo Training

join.me

Grasshopper

OpenVoice

Remote Solutions Products

GoTo Resolve

Rescue

GoToAssist

Access Products

Pro

Central

GoToMyPC