Connection and startup FAQs in LogMeIn Pro
Connect to a computer using your domain user account
If the user in question is an administrator for the host computer, no configuration is needed. Log into the host computer as normal, being sure to select the domain in the Log on to field at the authentication screen.
If the user account is not an administrator, it will need to be added to the access list. For details, see Specify user access rights.
Prevent disconnection when another person logs in to your LogMeIn host
When you are controlling your host computer, you may be disconnected if another person tries to log in to that same computer remotely.
To prevent being disconnected when this happens, you must create a Host Preference package:
You must have a LogMeIn Pro Base subscription and the LogMeIn Control Panel must be installed on the host computer.
- In LogMeIn Pro, go to the page.
- Select the name of the Host Preference Package that you want to change.
- Select the Advanced from the Category drop-down menu.
- In the Remote Control section, select the Disconnect existing remote control session from the same user option.
- Select Save at the bottom of the page.
- Add the host computer to the newly created Host Preference package.
Manually set the LogMeIn host to start in Safe Mode
To launch the host in Safe Mode with Networking add the following key to the system registry.
[HKEY_LOCAL_MACHINE\SYSTEM\CurrentControlSet\Control\SafeBoot\Network\LogMeIn] @="service"
The host maintenance service can be started the same way: [HKEY_LOCAL_MACHINE\SYSTEM\CurrentControlSet\Control\SafeBoot\Network\LogMeIn Maintenance Service] @="service"
Restart windows and press F8 to get boot options and select Safe mode with Networking.
Displaying LogMeInRemoteUser on the Windows welcome screen
This problem can occur when Windows encounters an error. There is a setting in Windows for each user that instructs whether or not to display a username on the Welcome Screen.
To resolve this problem, please follow the steps below:
First, try pressing CTRL+ALT+DEL twice quickly to get a standard login box. This should allow you to login with your normal username. If this is successful, and you can login, try rebooting to see if this has fixed the issue. If the issue persists after the above, try this:
- Go to .
- Type regedit [press Enter].
- Go to HKEY_LOCAL_MACHINE\SOFTWARE\Microsoft\Windows NT\CurrentVersion\Winlogon\SpecialAccounts\UserList
- Right-click in the main part of the window, and choose to create a new REG_DWORD value, name it as LogMeInRemoteUser and set its value to 0.
When you save this and reboot, this username will no longer show in the Welcome Screen.
Troubleshoot disconnecting at "Verify Identity"
When connecting to your host machine, your LogMeIn Pro hangs at the Verify Identity stage and disconnects.
Cause
Windows caches Certificate Revocation Lists (CRL) and CA certificates to quickly verify certificate chains, which can cause the client not to pick up a new CRL until the locally cached CRL has expired.
Explanation
There are a number of ways this can happen, but it is most often related to certificate issues at the host or client computer.
HKLM\SOFTWARE\Microsoft\WindowsNT\CurrentVersion\RegisteredOrganizationIf RegisteredOrganization has a value, then it will be added to the subject of the CA as follows: cert:CN=<RegisteredOrganization> CA
where CN stands for Common Name, also known as FQDN.
If RegisteredOrganization has no value, then the default Certificate Authority will be used. To get this value, LogMeIn has to read the Microsoft Certificate Authority. LogMeIn automatically generates a Certificate Authority (self-signed) cert to sign its own webserver certification.
Resolution
If you can connect to your host computer from another client (Mobile app, another computer, etc.), perform these steps on the Client machine.
If you cannot connect from any computer, perform these steps on the Host machine.
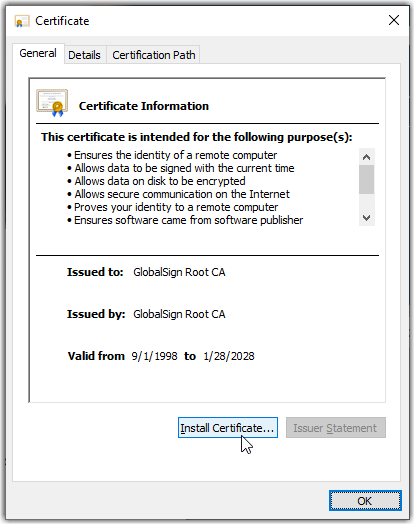
- Download the certificates to the Host machine
- In the order above, select the certificate to start the import process.

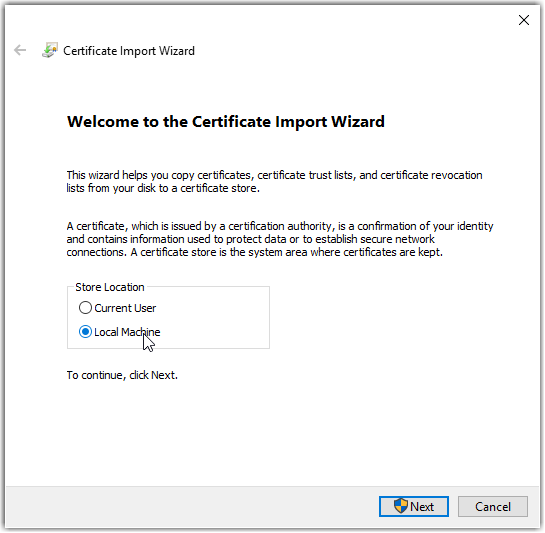
- If you are given the choice between Current User or Local Machine, choose Local Machine and select Next.

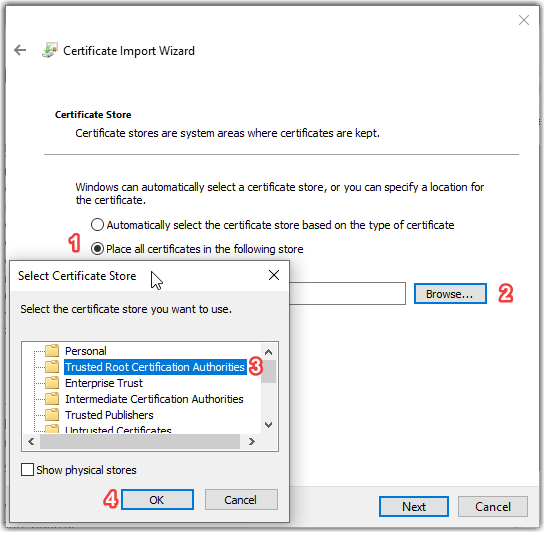
- For Root-R1 and Root-R3, navigate to and store the certificates in Trusted Root Certification Authorities as below.
 Note: gsorganizationvalsha2g2r1.crt can be placed Automatically after the root certificates are installed.
 - Select Next and Finish.
Important:
- If the above was done on a Host computer, restart the host service before attempting another connection.
- If the above was done on a Client computer, restart your computer before attempting another connection.
Using LogMeIn Pro on headless computers (with no monitor attached)
Headless computers can be controlled just as any other computer running Host software.
Symptom
When connected to a headless host, you see a blank screen or you are forced to use 640x480 resolution and are unable to change it.
Cause
No display adapters are installed on the headless host.
When LogMeIn Pro is installed on a host computer, it installs the Mirror Driver under .
The role of the Mirror Driver is to reproduce the host screen and send it through to the client. In the case of a headless host, it may happen that no display adapter was ever installed, therefore the Mirror Driver has nothing to reproduce.
Solution
Install display adapters on the host. For details and instructions, see the Microsoft Support site.
If your computer already has display adapters installed, you may need to update the existing drivers:
- Open the Device Manager (on Windows 10, type Windows key + X).
- Under Display Adapters, right-click your display adapter (not the Mirror Driver) and select Update Driver Software....
- Select Search automatically for update driver software.
- If an update is found, update your driver. You may be prompted to restart your machine.
Supporting Terminal Server session control
The application supports Terminal Server session control.
When connected to a Host that is a server running Terminal Server services or is hosting an incoming Windows Remote Desktop session, you will see the Terminal Server icon under Options and all active connected Terminal Server sessions.
You can only view the screen of a terminal session when the local user (the person connected to the Server via remote desktop or Terminal Services Client) is viewing the host in full screen or windowed mode. If the Terminal user minimizes the session to system tray, the Windows server turns off the display for the actual session. When you connect via the host software and select a minimized Terminal session you see the following message:
This Terminal server display is inactiveTo resolve this, make sure the local user is viewing the host in full screen or windowed mode.
- This feature is available to LogMeIn Pro, former LogMeIn Central Premier, and current LogMeIn Central Base plan subscribers only.
- When you install LogMeIn Pro on a Terminal Server, LogMeIn Pro requires system reboot after installation.
How do I resolve 'Terminal Server Display is Inactive' when I try to Remote Control?
You may experience this issue when using Microsoft Remote Desktop with the host.
To resolve this issue, reboot the host computer. If this does not work, reinstall the host while physically sitting at the host computer.
Starting the LogMeIn host automatically on Windows
By default, the host should start automatically on Windows. If it does not, it could have been manually disabled.
- Select (Vista/7 users can use the Start search box) and type MSCONFIG and press Enter. System Configuration is displayed.
- Under the Startup tab, make sure that the LogMeIn box is checked. Close the System Configuration window.
- Select (Vista/7 users can use the Start search box) > type Services.msc and press Enter.
- Find and double-click LogMeIn.
- Ensure it is set to Automatic.
- Do the same for LogMeIn Maintenance.
This will make the host start every time the computer starts.
If this still does not work, ensure your software firewall is permitting LogMeIn Pro.
