LogMeIn support sites no longer support Microsoft's Internet Explorer (IE) browser. Please use a supported browser to ensure all features perform as they should (Chrome / FireFox / Edge).

The GoTo support site no longer supports Safari 15. Please upgrade your browser to Safari 16 (or newer) or switch to a supported browser such as Google Chrome, Mozilla Firefox, or Microsoft Edge.

Maintain your IT infrastructure with powerful RMM software. Discover LogMeIn Central.

We are currently experiencing an unplanned outage for this product. View Service Status
  • Support
  • Products

    Explore support by product

    GoTo Connect

    All-in-one phone, meeting and messaging software

    GoTo Meeting

    Video and audio meeting software

    GoTo Webinar

    All-in-one webinar and virtual events software

    GoTo Room

    Conference room hardware

    GoTo Training

    Online training software

    OpenVoice

    Audio conferencing software

    Grasshopper

    Lightweight virtual phone system

    join.me

    Video conferencing software

    LogMeIn Resolve

    IT management & support

    LogMeIn Resolve MDM

    Mobile device management

    LogMeIn Pro

    Remote device access

    LogMeIn Central

    Remote monitoring & management

    LogMeIn Rescue

    Remote IT support

    GoToMyPC

    Remote desktop access

    GoToAssist

    Remote support software

    Hamachi

    Hosted VPN service

    RemotelyAnywhere

    On-prem remote access solution
  • Community
  • Trainings
  • Service Status
  • Try the improved My Cases portal

    Easily manage your ticket, track its status, contact us from an existing case, and more.

    Sign in to try
  • Language selector icon Language selector icon
    • English
    • Français
    • Italiano
    • Deutsch
    • Español
    • Português
    • Nederlands
  • Contact Support
  • Service Status
  • User Avatar User Avatar
    • Support
    • Contact Support
    • Browse Products
    • Service Status
    • Community
    • Trainings
    • Sign in
    • User Avatar
    • My Account
    • Personal Info
    • Sign In & Security
    • My Cases
    • Billing Center
    • https://link.goto.com/myaccount-billing
    • My GoTo Connect
    • My Meetings
    • My Webinars
    • My Trainings
    • My Conferences
    • My Resolutions
    • My Mobile Devices
    • My Sessions
    • My Sessions
    • My Incidents
    • Sign out
  • Explore Features
  • Hamachi VPN
  • Hamachi FAQ
product logo
Back button image Back
Back button image
product logo

Why do I receive 'Failed to Connect to Engine' in Hamachi

The error "Failed to connect to engine" is caused by the Hamachi Tunneling Engine either failing to start, being in an error state, or being blocked by anti-virus software.

Important: Please use care when accessing the Windows Registry. Consult with your IT support if you are unsure how to proceed.

On Windows

To find the status of the engine:

  1. Press the Windows key and the [R] key on the keyboard.
  2. In the run box type services.msc, and press [Enter].
  3. Look for the Hamachi Tunneling Engine.

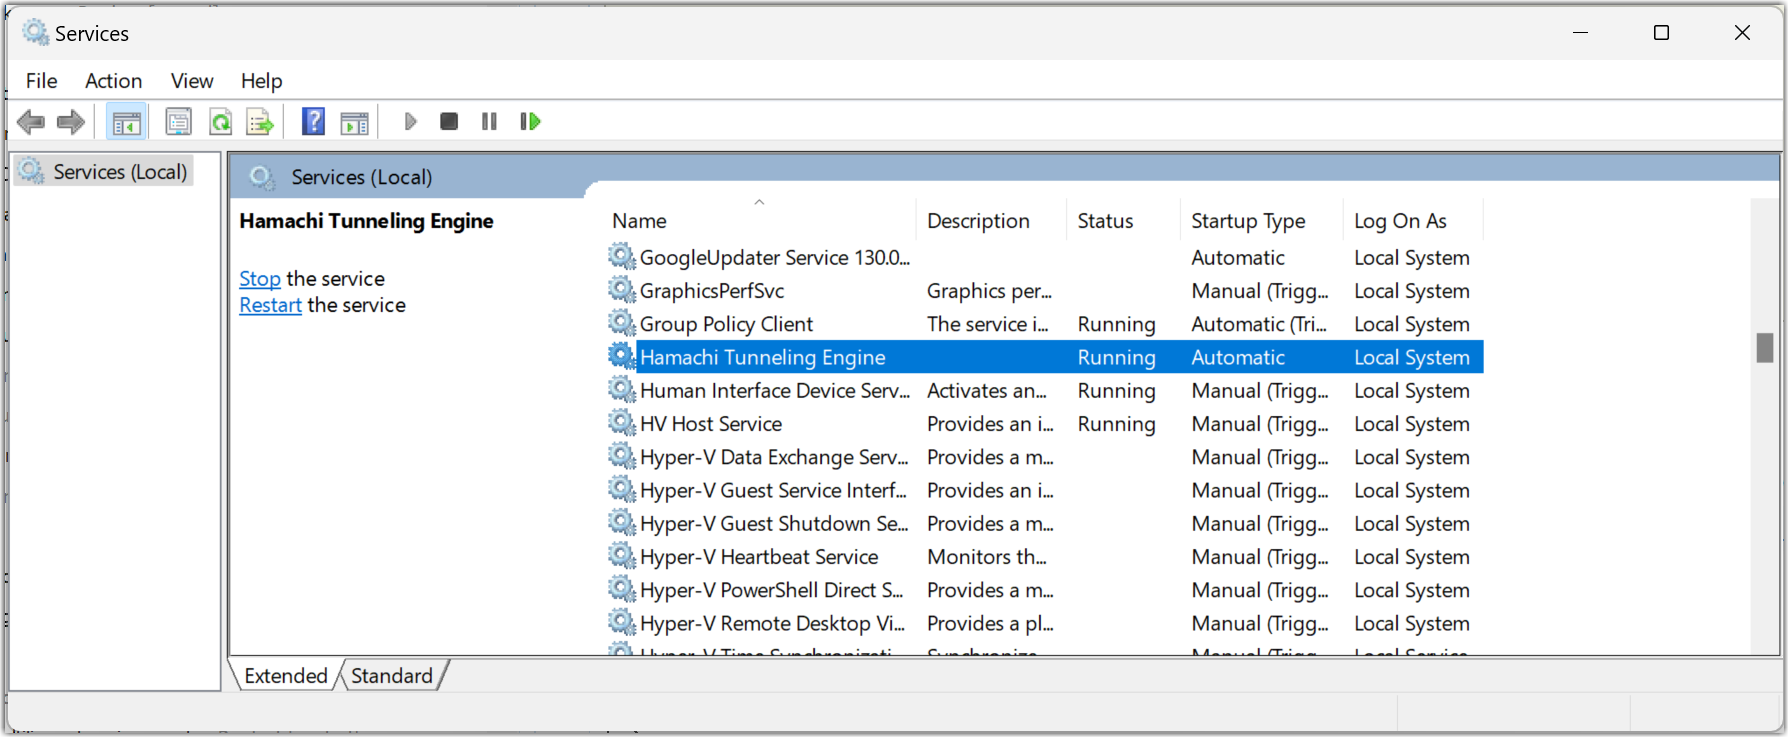
If the engine is in any of the following states:

  • Started
  • Starting
  • Stopping

Then try restarting either the service, or the entire computer.

If the service is not running or you receive an error upon start-up, do the following:

  1. Press the Windows key and the [R] key on the keyboard.
  2. Type regedit and press Enter on your keyboard.
  3. Check the following registry location:
    • On 32-bit Windows: HKEY_LOCAL_MACHINE\SOFTWARE\LogMeIn Hamachi
    • On 64-bit Windows: HKEY_LOCAL_MACHINE\SOFTWARE\Wow6432Node\LogMeIn Hamachi
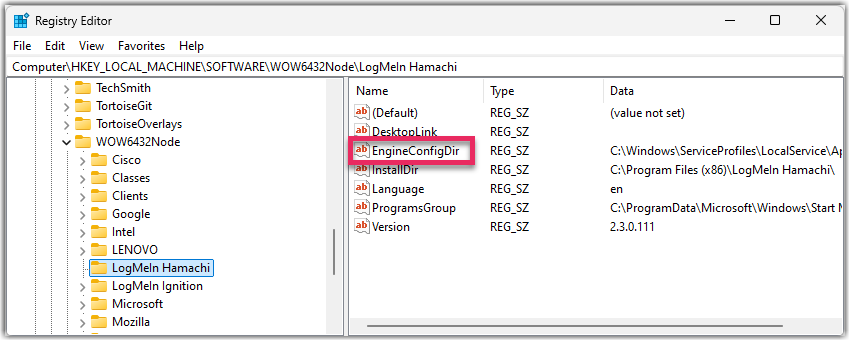
  4. Find the String Value (REG_SZ) labeled EngineConfigDir.

    If this is not present, create it by right-clicking in the blank space and choosing New > String Value. You may enter any folder location you desire, and it will create the necessary files there for the engine to run.

Tip: If your anti-virus software is reporting/blocking Hamachi-2-ui.exe, you will need to add an exclusion for the Hamachi-2-ui.exe program. Please consult your anti-virus software documentation for assistance with adding an exclusion to the allowed list.

On a Mac running macOS Ventura or earlier

You may experience the same issue on a Mac if you have a Mac running on an Intel-based CPU, you use macOS High Sierra 10.13 or newer, and you have not granted permission to use kernel extensions (kexts).

To resolve the issue, grant permission to use kexts in the System Preferences and then reboot your device. Here's how:

  1. Open System Preferences from the Apple menu.
  2. Go to Security & Privacy.
  3. Select the General tab.
  4. If general settings are locked, select the lock icon in the lower-left corner. Enter your device password and then select Unlock.
  5. Select Allow next to kernel extension that requires approval.
  6. Reboot your device.

On a Mac running macOS Sonoma or later

You still have to grant permission to use kernel extensions (kexts). Here's how:

  1. Open the Security & Privacy tab on your device.
  2. Select Open Security Preferences when you see a System Extension Blocked pop-up.
  3. Scroll down to the Security section and select Allow applications downloaded from the App Store and identified developers.
  4. Select Enable System Extensions.
  5. In the pop-up that shows "To enable system extensions, you need to modify your security settings in the Recovery environment", select Shutdown to turn off your Mac.
  6. When your Mac is turned off, press and hold the power switch (Touch ID) until you see the "Loading up startup options" message.
  7. Select Options and then Continue to boot the M processor-based Mac, or Apple Silicon Mac to macOS Recovery Mode.
  8. From the Utilities menu at the top , select Startup Security Utility.
  9. Select Security Policy.
  10. In Startup Security Utility, choose Reduced Security and select the Allow user management of kernel extensions from identified developers option.
  11. Select OK, enter the correct admin password, and wait until the security level change completes.
  12. Restart your Mac.
  13. Go to the Privacy & Security window again and select Allow in the Security section this time.

    If you have more than one system extension to be enabled or updated, you will see the Details button instead Select it to switch on the system extensions that you want to allow, and select OK to confirm.

  14. After entering your admin password, restart your Mac to finish the installation.

Need help?

Contact icon Contact support
Manage Cases icon Manage cases
Community icon Ask the Community
Training icon Attend trainings
Video icon Watch videos
  • Language selector icon Language selector icon
    • English
    • Français
    • Italiano
    • Deutsch
    • Español
    • Português
    • Nederlands
  • About Us
  • Terms of Service
  • Privacy Policy
  • Trademark
  • Do Not Sell or Share My Personal Info
  • Browse Products
  • Copyright © 2025 GoTo Group, Inc. All rights reserved

Collaboration Products

GoTo Connect

GoTo Meeting

GoTo Webinar

GoTo Training

join.me

Grasshopper

OpenVoice

Remote Solutions Products

GoTo Resolve

Rescue

GoToAssist

Access Products

Pro

Central

GoToMyPC