LogMeIn support sites no longer support Microsoft's Internet Explorer (IE) browser. Please use a supported browser to ensure all features perform as they should (Chrome / FireFox / Edge).

The GoTo support site no longer supports Safari 15. Please upgrade your browser to Safari 16 (or newer) or switch to a supported browser such as Google Chrome, Mozilla Firefox, or Microsoft Edge.

Discover what our all-in-one IT solution can do for your business. Get LogMeIn Resolve free.

We are currently experiencing an unplanned outage for this product. Service Status
  • Support
  • Products

    Explore support by product

    GoTo Connect

    All-in-one phone, meeting and messaging software

    GoTo Meeting

    Video and audio meeting software

    GoTo Webinar

    All-in-one webinar and virtual events software

    GoTo Room

    Conference room hardware

    GoTo Training

    Online training software

    OpenVoice

    Audio conferencing software

    Grasshopper

    Lightweight virtual phone system

    join.me

    Video conferencing software

    LogMeIn Resolve

    IT management & support

    LogMeIn Resolve MDM

    Mobile device management

    LogMeIn Pro

    Remote device access

    LogMeIn Central

    Remote monitoring & management

    LogMeIn Rescue

    Remote IT support

    GoToMyPC

    Remote desktop access

    GoToAssist

    Remote support software

    Hamachi

    Hosted VPN service

    RemotelyAnywhere

    On-prem remote access solution
  • Community
  • Trainings
  • Service Status
  • Try the improved My Cases portal

    Easily manage your ticket, track its status, contact us from an existing case, and more.

    Sign in to try
  • Language selector icon Language selector icon
    • English
    • Français
    • Italiano
    • Deutsch
    • Español
    • Português
    • Nederlands
  • Contact Support
  • Service Status
  • User Avatar User Avatar
    • Support
    • Contact Support
    • Browse Products
    • Service Status
    • Community
    • Trainings
    • Sign in
    • User Avatar
    • My Account
    • Personal Info
    • Sign In & Security
    • My Cases
    • Billing Center
    • https://link.goto.com/myaccount-billing
    • My GoTo Connect
    • My Meetings
    • My Webinars
    • My Trainings
    • My Conferences
    • My Resolutions
    • My Mobile Devices
    • My Sessions
    • My Sessions
    • My Incidents
    • Sign out
  • Explore Resolve
  • Features and Tools
  • Problem Management
product logo
Back button image Back
Back button image
product logo

Problem management in LogMeIn Resolve

Problem management allows you to link multiple helpdesk tickets to the same incident and thus create a problem ticket. It creates a parent-child relationship between tickets and allows agents to document the root cause of and the solution to a problem that impacts several users. This feature requires a Premium or MSP license.

Example:

Let's say your agents start receiving helpdesk tickets that your organization's VPN solution does not work. Your agents want to make sure that these tickets are linked so that they can be treated together. When a solution is found, an agent can resolve the problem and also close all helpdesk tickets at once. Magic, right?

Benefits of creating a problem ticket

A problem ticket allows you to solve the following issues in your organization:

  • There are multiple incoming helpdesk tickets about the same incident and agents want to link them together.
  • Agents want to manage child tickets originating from a parent ticket in bulk, for example to close or reply to all of them.
  • Agents want to document the root cause and the solution to a problem.

To use problem management, an agent must have the Problem management user setting enabled. See Change a user's settings.

Create a problem ticket in LogMeIn Resolve

Create a problem ticket to link helpdesk tickets that are related to the same issue.

Note: This feature requires a Premium or MSP license.
  1. Sign in to the Console at http://console.gotoresolve.com.
  2. Go to the Helpdesk > Problem management page.
  3. Select Add problem in the top-right corner.
  4. Fill in the details of the problem.
    Service affected
    Name of internal IT services that are affected. By default, you can select Facilities, Network, and Phones.
    Created by
    Created by: The name of the agent who created the problem ticket. This field is automatically filled in with the agent's name who created the problem ticket.
    Tenant
    Name of the tenant where the problem ticket was created. This field is only visible to users with an MSP license.
    Subject
    Subject: The subject of the problem as entered when the problem ticket was created. This is a required field.
    Summary
    Description of the problem. The more information you share the easier it is for other agents to take action. Selecting Attach files to problem allows you to upload files that can help identify and solve the issue.
    Status
    The current status of the problem ticket. You can choose from Open, In progress, Blocked, and Closed. The status of the problem as defined in GoTo Admin.
    Assigned to
    The name of the agent who is currently assigned to the problem ticket.
    Priority
    Set the urgency of the ticket. Default priority is Medium. This field cannot be empty.
    Category
    High-level category of the problem. You can choose from Software, Hardware, and Telecom.
    Due date
    Date and time by when the problem ticket should be resolved.
    Error type
    Type of the error that the problem relates to, such as an Analysis and Diagnosis Error.
    Affected regions/sites
    The geographical region of the affected sites, such as US, EMEA, or APAC.
    Business impact
    The problem's level of impact on your organization. Choose from Critical, Moderate, and Low.
    Cc
    Select a user to add as a follower to the ticket. The follower will get email notifications when there's a change in the ticket.
    Labels
    Select a label that further specifies the problem. You can choose from predefined labels or create a new one by selecting Add new or manage.
  5. Select Save details.
What to do next: After creating a problem ticket, you have the following options:
  • Link helpdesk tickets to a problem
  • Mark a problem as read or unread
  • Add a comment to the problem
  • Delete a problem if you no longer need it
  • Create a root cause analysis report
  • Close a problem by changing its status to Closed. This also closes all linked helpdesk tickets at once.

Create a problem from existing helpdesk tickets

  1. Go to the Helpdesk page.
  2. Select one or more tickets from which you want to create a problem ticket.
    If you select multiple tickets, on the Create problem from tickets page, you must choose a parent ticket and then select Create problem.
  3. Fill in the details of the problem as described above.
    Some fields may be pre-filled based on the details of the source ticket.
  4. Select Save details.

Link helpdesk tickets to a problem

You can either select helpdesk tickets first and link them to a problem, or select a problem first and link helpdesk tickets to the problem.

You can either select helpdesk tickets first or a problem ticket and go from there.

Link helpdesk tickets to a problem from the Helpdesk page

This is when you first select child tickets and link those to a parent ticket.
  1. In the Console, go to the Helpdesk page.
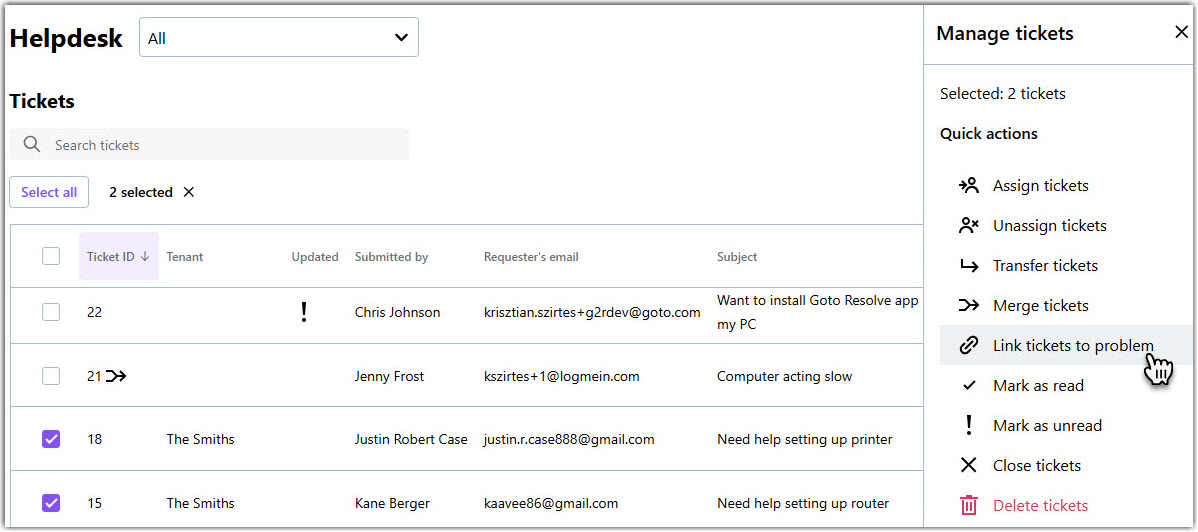
  2. Select the tickets that you want to link to a problem.
  3. Select Link tickets to problem on the right.
  4. Select the parent problem ticket that you want to link your helpdesk tickets to.
    You can only select one problem ticket as a parent.
  5. Select Link tickets.

Results: When you open your problem ticket, it now contains your linked helpdesk tickets on the Related tab.

Link helpdesk tickets from the Problem management page

  1. In the Console, go to the Helpdesk page.
  2. Select a problem ticket.
  3. On the Related tab, select Link tickets to this problem.
  4. Select the helpdesk tickets that you want to link together.
    You can only select helpdesk tickets that have not yet been linked to another problem ticket.
  5. Select Link tickets.

Working with existing problem tickets

You can manage problem tickets by marking them as read or unread, adding comments, and deleting them if necessary. You can also hide comments from end-users to keep them private.

Mark a problem ticket as read or unread

When another agent creates a problem ticket, it is displayed as unread until you either open that ticket or manually set it to read. You see an icon in the Updated column when there is an unread ticket.

  1. On the Problem management page, select the tickets that you want to set to read or unread.
    The Manage problems window is displayed on the right.
  2. Do one of the following:
    • Select Mark as read to acknowledge the new ticket and remove the icon from the Updated column.
    • Select Mark as unread to set a reminder to yourself that the problem ticket needs your attention.
  3. Confirm your action.

Comment on a problem

You can add comments to any problem ticket. Comments are sent to all impacted end-users unless the agent specifically hides the comment from them.

  1. On the Problem management page, open a problem ticket by clicking its name.
    The Details tab of the problem is displayed.
  2. Scroll down to the Comments filed and enter your comment.
  3. Select Add comments when you are done.
    The problem ticket is updated and end-users whose helpdesk tickets are linked are notified automatically.
What to do next: You can hide a comment from end-users so that only agents see your notes. To do so, scroll to the Comments section of the ticket and select the Hide from end-users option next to a comment.

Delete a problem ticket

Delete a problem if you no longer need it.

  1. On the Problem management page, select the tickets that you want to remove.
    The Manage problems window is displayed on the right.
  2. Select Delete problem.
  3. Confirm your action.

Export a problem ticket

Export either the problem or the RCA report to PDF.
  1. On the Problem management page, open a ticket that you want to export.
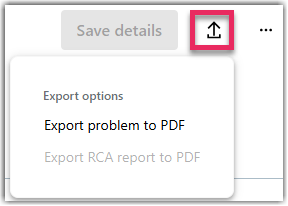
  2. Select Export in the top-right corner.
  3. Depending on what you want to export, select one of the following option:
    • Export problem to PDF: Saves the details of the problem ticket in PDF format.
    • Export RCA report to PDF: Saves the root cause analysis of your problem ticket in PDF format. This option is only available if the ticket has an RCA report.

Sort and filter problem tickets

You can sort problem tickets by selecting any of their attributes that are displayed at the top of the Problem management page. You can also change which attributes you want to display.

Filter your problem tickets

  1. Sign in to the Console at http://console.gotoresolve.com.
  2. Go to the Helpdesk > Problem management page.
  3. Select Add filters above your tickets.
  4. Choose the filters you want to apply:
    • Tenants: Name of the tenant whose problem tickets you want to display.
    • Service affected: Name of internal IT services that are affected.
    • Created: Date and time when the problem ticket was created.
    • Due date: Date and time by when the problem ticket should be resolved.
    • Updated: Date range when the ticket was last updated.
    • Category: High-level category of the problem.
    • Priority: The priority of dealing with the problem ticket.
    • Status: Current status of the problem ticket.
    • Labels: Name of the labels that you were assigned to the problem tickets
    • Assigned to: The name of the agent who is currently assigned to the problem ticket.
    • Affected regions/sites: The geographical region of the affected sites.
    • Assignment status: You can filter for assigned or unassigned tickets.
    • Business impact: The problem's level of impact on your organization.
    • Error type: Type of the error that the problem relates to.
  5. Optional: Select Save view as favorite at the top of the filter panel to save your selected filters as a quick link that you can apply later. Favorite filters are listed at the top of the filter panel.
  6. Select Apply.

Choose the problem ticket details you want to see

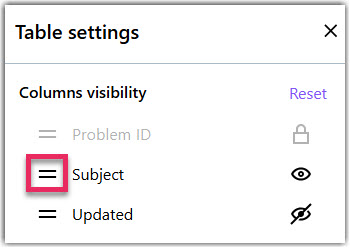
  1. On the Problem management page of the Console, open the column selector in the top-right corner.
  2. Select the name of a field to change its visibility. The following fields are available:
    • Problem ID: The internal identifier of the problem ticket. This field is always visible.
    • Updated: An exclamation mark is displayed when you have not yet opened the ticket.
    • Created by: The name of the agent who created the problem ticket.
    • Creator's email: Email address of the agent who created the problem ticket.
    • Subject: The subject of the problem as entered when the problem ticket was created.
    • Category: High-level category of the problem. You can choose from Software, Hardware, and Telecom.
    • Status: The current status of the problem ticket. You can choose from Open, In progress, Blocked, and Closed. The status of the problem as defined in GoTo Admin.
    • Business impact: The problem's level of impact on your organization. Choose from Critical, Moderate, and Low.
    • Priority: The priority of dealing with the problem ticket. Choose from Urgent, High, Medium, and Low.
    • Assigned to: The name of the agent who is currently assigned to the problem ticket.
    • Due date: Date and time by when the problem ticket should be resolved.
    • Last updated: Date and time when the ticket was last modified.
    • Updated by: Name of the agent who last updated the ticket.
    • Created at: Date and time when the problem ticket was created.
    • Error type: Type of the error that the problem relates to, such as an Analysis and Diagnosis Error.
    • Tenant: Name of the tenant where the problem ticket was created.
  3. Optional: Drag and drop columns to rearrange their order of appearance.
  4. Select Apply.
    You can reset your view to default by selecting Reset at the top of the dialog.

Sort your problem tickets

You can sort your problem tickets by clicking any of the column headers on the Problem management page.

By default, 10 problem tickets are displayed on a page. Use the Rows per page drop-down to change the number of tickets to list.

Run a root cause analysis of a solved problem

A Root cause analysis (RCA) is a report that you can write and save as a PDF file after an agent finds a solution to the problem. An RCA report describes the original issue and any potential findings, workarounds, solutions, and recommendations for the future.

  1. On the Problem management page, open the ticket where you want to create an RCA report.
  2. On the RCA Report tab, enter the following details:
    • Root cause: The original cause of the incident related to the problem.
    • Workaround: Describe a potential workaround to the incident.
    • Expectations: Describe what expectations you had before the problem occurred.
    • Changes prior to the problem occurring: Describe the changes that were made before the problem surfaced. This may provide insights into what to avoid and what to expect in the future.
    • Investigation findings: Describe the data you have analyzed while investigating the problem.
    • Contributing factors: Add any factor that could have led to the problem.
    • Whys: Type up to five questions that you would like to have answered after a resolution is found.
    • Resolution: Describe how the incident was resolved.
    • Recommendations: Add steps to prevent similar problems from occurring in the future.
    • Lessons learned: Provide insights or lessons you have learned from the incident.
    • Updates to knowledge base: Describe what changes you have implemented in your knowledge base articles if any.
    • Monitoring: Describe how the incident will be monitored to ensure the problem does not reoccur.
    • Change log: Select a date and describe the changes you have made on the report.
    • Report prepared by: Name, position, and email address of the person who created the report.
  3. Save your report.
  4. Optional: Select the Export PDF icon to save the report as a PDF file.

Frequently Asked Questions

What license do I need to use Problem Management?
This feature requires a Premium or MSP license.
Can I link multiple helpdesk tickets to a single problem ticket?
Yes. You can link any number of helpdesk tickets to a problem.
Can I link a helpdesk ticket to multiple problem tickets?
No.
Can I customize problem ticket details to add my own categories and business impact types?
Not yet. This will be part of a future release.
As an admin, where can I enable Problem Management for my agents?
Sign in to GoTo Admin and go to the People > Users page. Select a user and on the Settings tab, enable Problem management. For more information, see Change a user's settings.
Article last updated: 18 June, 2025

Need help?

Contact icon Contact support
Manage Cases icon Manage cases
Community icon Ask the Community
Training icon Attend trainings
Video icon Watch videos
  • Language selector icon Language selector icon
    • English
    • Français
    • Italiano
    • Deutsch
    • Español
    • Português
    • Nederlands
  • About Us
  • Terms of Service
  • Privacy Policy
  • Trademark
  • Do Not Sell or Share My Personal Info
  • Browse Products
  • Copyright © 2025 GoTo Group, Inc. All rights reserved

Collaboration Products

GoTo Connect

GoTo Meeting

GoTo Webinar

GoTo Training

join.me

Grasshopper

OpenVoice

Remote Solutions Products

GoTo Resolve

Rescue

GoToAssist

Access Products

Pro

Central

GoToMyPC