Master Account Holders can import Active Directory users as Rescue Admins into their organization. Key user data in Rescue will be automatically updated when those change in Active Directory.
- Generate a service token and default password for new users in the Admin Center.
- Select the Global Settings tab.
- To generate a service token, click Generate and Copy under Active Directory Synchronization.

Result: A service token is generated and copied to your clipboard.
- Define the default password you want your new admins to use for their first login.
Note: Users are required to change this password upon their first login.
- At the bottom of the page click Save.
- Download and extract the server application.
- In the LogMeIn Rescue Administration Center, under Active Directory Synchronization, click Download to download the service installer.

Result: The service installer is downloaded to your computer in a zip file.
- Extract the zip file to a folder.
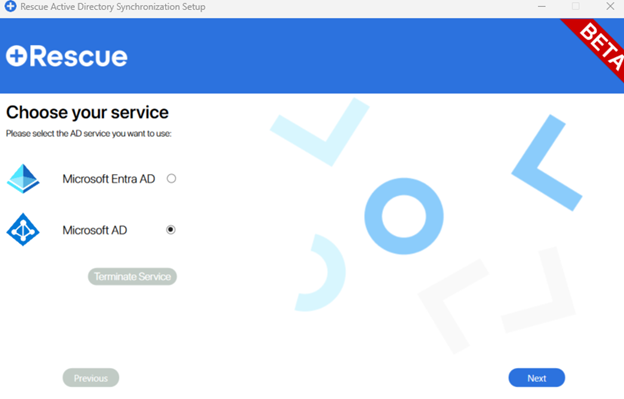
- Run the server application, and configure synchronization behavior.
Important: You need privileges to run the application as a system service. The computer running the application must be connected to Active Directory with sufficient permissions to access and query all Active Directory groups and users.

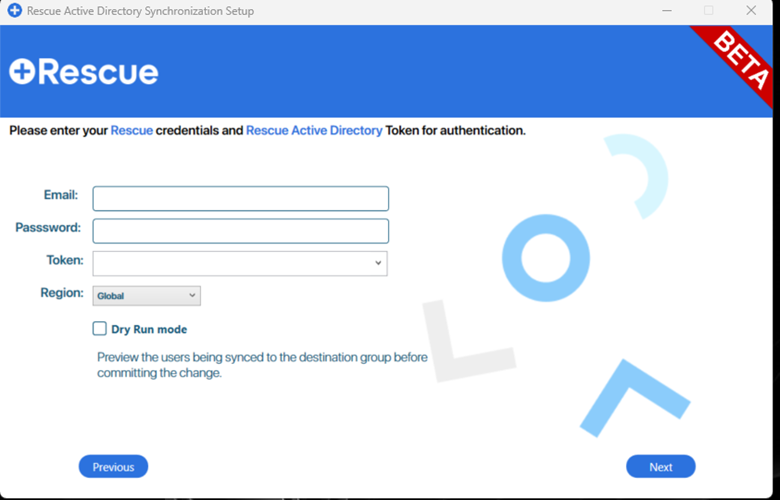
- Submit the following credentials:
- Master Account Holder LogMeIn Rescue credentials
- The service token you previously generated on the Global Settings tab of the Admin Center.
- Region
Note: Enabling Dry Run mode generates an Excel file previewing potential synchronization changes to your LogMeIn Rescue hierarchy tree.
Important: If you select Dry Run mode, synchronization can ONLY be used as a Windows terminal application.

- Click Next.
Note: The application runs in Admin mode.
- Enter your Entra App credentials, and click Next.

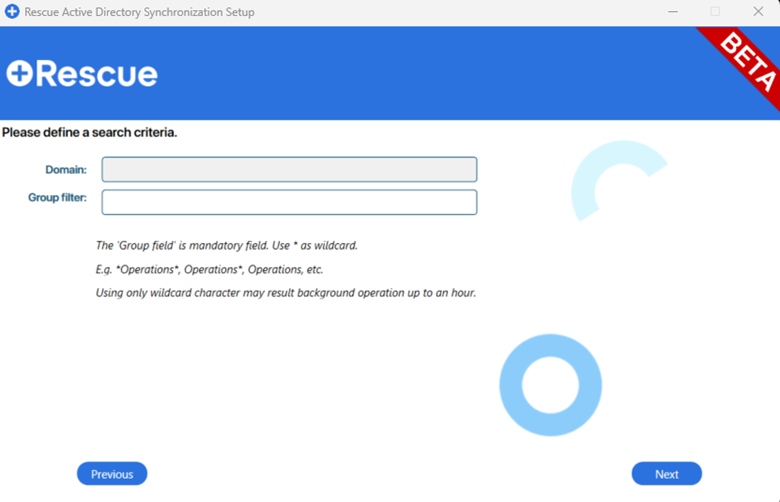
- Enter a search criteria (for example 'support').
- Enter a search term (for example 'aid'). Make sure to use your own domain in the Domain field.

Result: AdSync searches for this term between the configured AD groups.
- Run the server application, and configure synchronization behavior.
Important: You need privileges to run the application as a system service. The computer running the application must be connected to Active Directory with sufficient permissions to access and query all Active Directory groups and users.
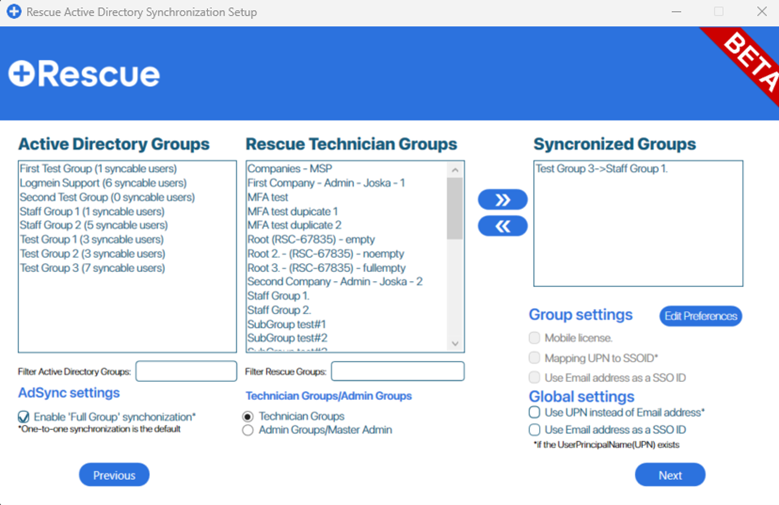
- Select the Admin Groups/Master Admin Groups you want to synchronize.
- Click the Admin Groups/Master Admin radio button under Technician Groups/Admin Groups
- Select groups to synchronize:
- The first column contains the Microsoft Entra AD Groups, select one Active Directory group you want to synchronize with a Rescue Admin Group.
- The second column contains the Rescue Admin Groups, select one group that will be synchronized with the AD group.
- Click the right arrow to confirm the paring.
Note: Users in the selected AD group will receive corresponding admin privileges in LogMeIn Rescue.
- Optional: To synchronize multiple groups, repeat the previous step.
Note: To remove a pairing, select it in the third column and click the left arrow.
- Configure synchronization settings:
-
Enable Full Group synchronization (default: enabled)
-
- Enabled: Performs one-to-one synchronization (groups, users, and hierarchies match Entra AD exactly)
- Disabled: Only synchronizes user status updates; users in different groups remain in place
- Configure group-specific settings:
- Mobile license: Assigns mobile licenses to group members if available.
- Mapping UPN to SSOID (Entra AD only): Maps SSO IDs directly to UPNs.
- Use Email address as a SSO ID (Entra AD only): Sets email addresses as SSO IDs.
- Edit Preferences: Select specific user attributes to synchronize.
- Set Global settings:
- Use UPN instead of Email address: When checked, you can use "UserPrincipalName" instead of an email address in LogMeIn Rescue.
- Use Email address as a SSO ID: When checked, the SSO ID in LogMeIn Rescue gets the email address.
- Select Next and confirm the synchronization.
- A warning pops up asking you whether you want to proceed with counting the number of users in the group.

Note: The maximum limit is 999 groups, with up to 999 members per group. The wizard loads previously configured groups for easier reconfiguration.

- Select Next.
- In the resulting pop-up window click Yes to continue with the synchronization.
- Select how AdSync will run:

- Select a synchronization mode:
- Start Active Directory Synchronizer as a service
- Start Active Directory Synchronizer as a Windows terminal application
Important: Running the synchronizer as a Windows app will also place an icon resembling to the LogMeIn Rescue logo in the System tray. You can hide or unhide the application by right-clicking on it. If you want to the stop the synchronization process, use the Close the program option.
- Configure settings:
- Interval to send changes (minutes): You can enter your preferred frequency of the synchronization operation.
- For Windows terminal application only:
- Start immediately (optional)
- Hide terminal window at startup (optional)
- Select Install service or Start App.
Note: When running AdSync as a Windows terminal application, the program places a LogMeIn Rescue logo icon in your System tray. Right-clicking this icon allows you to hide or unhide the application window or close the program completely. If you're using Dry Run mode, an Excel file is generated in the same directory as the .exe file, providing detailed synchronization results.
Important: Use the Close the program option only when you want to stop the synchronization process entirely.
- If the installation was successful, click Finish, and close the installer.
Results:
Restriction: It is not possible to delete an admin from the LogMeIn Rescue Admin Center by using the Active Directory synchronization service. When a user is deleted or moved in Active Directory, the corresponding LogMeIn Rescue admin is disabled.
Note: If an admin is moved to another LogMeIn Rescue Admin Group, subsequent synchronization will update the user's status and move the user back to its initial synchronization group.
Note: If a user is disabled, deleted, or moved in Active Directory, the admin's mobile license is freed up, and becomes available for other members of the LogMeIn Rescue organization.
Troubleshooting: If the synchronization service fails, you can get an error log by clicking Active Directory Logger at the bottom of the Active Directory Synchronization section on the Global Settings tab of the Admin Center.


